Monday, July 9, 2012

Sock Monkey Kids' Travel Pillow


Have you seen these seat belt pillows from Super Jenn? After seeing how comfy her kids looked, I knew I should totally make one for the car ride down to the Outer Banks for my three year old. And on a side note, with the HORRIBLE traffic we hit about just before we crossed over onto the islands, it took us 14 hours to get there. It was supposed to take us 11 hours. Sitting in three hour traffic for the last 15 miles was NOT FUN. Anyway...

This travel pillow was a completely free project! I almost forget about the miserable car ride when I think of the word free.

I already had the sock monkey fabric on hand. I had thrifted two sock monkey pillowcases awhile back and had a little fabric left after making a handmade swaddler for the baby.


Aww... Isn't he cute? He's a month old in this photo.
Now he's nine months old!


I followed Super Jenn's awesome tutorial, but I think I would have made the fabric flaps that go around the seat belt a little larger. I never did put velcro on mine because I don't think my flaps are large enough to get around the seat belt. That's okay though, because I could see my three year old throwing a tantrum on the interstate when he didn't want the pillow on his lap anymore. The way I did it, the pillow just rested on him so he could use it or not. He was free to remove it from his lap and throw it on his baby brother when he was done with it. Not adding the velcro also addressed the safety concern that some people had... although really, I don't think the thin flap of fabric that would have been under the seat belt would cause a safety issue. That flap is thinner than a sweatshirt or jacket!

To fill the pillow, I used a combination of thrifted polyfil and t-shirt scraps. I'd say the pillow was a huge success, and in a year or so, I'm going to have to make another one so that boy #2 has one too!

Sunday, July 8, 2012

Pirate Appliqued Jammies


Did you know that Blackbeard was killed off of the Outer Banks in 1718? Argh!


We are home from the Outer Banks! And usually, as you head north to Ohio, the temperature doesn't increase. But holy smokes, as we crossed the bridge from West Virginia into Ohio, the little temperature thingie on the car said that it was 107 degrees.

*Beads of sweat rolling down our faces*

This heat is no fun. I can't imagine what our men and women are going through in Iraq and other hot places. I hear it's like 120 degrees there typically :(

Back to sewing. I found some really cute pirate jammie pants down in the OBX. At $11.99, they were a bit of a splurge, but I bought them anyway because I'm a sucker for anything with pirates on them. They had really cute pirate jammie tops too, but none in his size. And even if there were some in his size, I wasn't about to spend another $11.99 for the top. The way it is, I could have bought 12-24 pairs of thrifted PJs for that (and nice ones too, not the ratty I-would-never-dress-my-kid-in-this kind!).

I also saw a really cute appliqued lady's pirate tee down there, and I'm kind of kicking myself for not getting it. I found it online in kid sizes and pinned it:


I figured I could free-hand a pretty good pirate head from looking at this picture, and make an appliqued pirate PJ top to match the PJ bottoms I bought on vacation.

As I had already invested $12 in this outfit, I wasn't about to put another single penny into it. Using things I already had on hand, I created a pirate PJ shirt for my son :) The shirt itself was from my sister-in-law's heading-to-goodwill pile. I sewed down a plain black shirt of hers to fit a four year old. And then using red, white, and black t-shirt scraps and some fusible web from my stash, I made the pirate.

I looooooooove how it turned out!!! He, on the other hand, was not thrilled about it until I pointed out that the pants have little guns on them like HIS gun! His gun is a replica George Washington pistol :)


Linking up to:


mop it up mondays

Wednesday, July 4, 2012

Old Navy Flag Tee Upcycle

$5 flag tees from Old Navy! Everyone has one (or ten). My in-laws gave me a big box of clothes that was headed to Goodwill, and my brother-in-law's 2011 flag tee was in there.

Free flag tee plus this tutorial from Crafterhours equals an awesome upcycled tank top to wear on Independence Day!


An Independence Day Onesie

Happy Birthday, America!!!
(From the sandy beaches of OBX!)


To celebrate her birthday, I made Jonas a cute USA onesie using everything I already had on hand :) The onesie was actually a hand-me-down that his older brother wore (and it was second-hand even back then). I also used fabric from my stash, as well as fusible web that I had thrifted a long time ago. I saw something similar at The Ribbon Retreat, and knew I wanted to make one :)

Enjoy!


Creations by Kara


Lil\'Luna
Someday Crafts Patriotic Linky Party

Thursday, June 28, 2012

The Man in the Yellow Hat Costume is now YELLOW


Woot, woot! My hubby ran to Meijer for milk late last night after the kids went to bed, and I told him to pick up a box of yellow RIT dye too. (In case you missed the post yesterday, I made a white "Man in the Yellow Hat" Halloween costume for my son, and I'm dying it yellow).

Last night I upcycled my sister-in-law's white linen skirt into white pants for Joel. The waist band is a little a lot girly, so I'm going to have to put some testosterone into it, but other than that, I'm lovin' the outfit!

This morning, the screaming darling baby and I came downstairs. Armed with a bottle of formula and a cup of coffee, we got to work dying the costume yellow!

I did it in a stock pot with just over a gallon of hot water and the entire box of dye. I did put it on the stove on low, but I was afraid of melting the plastic lid so I didn't turn it up high at all. The water never boiled and really wasn't all that hot. I only left it in the dye solution for 10 minutes, then I started rinsing. (And in case you're wondering like I was, RIT dye water CAN be saved for use at a later date! I wanted to keep the yellow water in case Joel outgrows the dress shirt. It's a 3T, but with my luck, he'll need a 4 by then. If he does, I'll just thrift another cotton dress shirt, and dye it too :) I have the water saved in an old milk jug with "DO NOT DRINK!" written all over it.

Back to the how-to... I put all three articles of clothes (the 100% cotton dress shirt, the linen pants, and the t-shirt material mock necktie) in the dryer on EXTRA low. Once again, I was worried about melting the plastic piece in the mock necktie, but it was just fine.

And now, drumroll please, I introduce to you Joel's Halloween costume this year.... The Man Who Still Does Not Have a Yellow Hat!


Ok, so I still need to make la piece de resistance, the yellow hat.

Here are some ideas I pinned:


Aren't they cute?! These ladies are awesome :)

Linking to
Delightful Order Thursday Linky Party!

Wednesday, June 27, 2012

Mock Necktie Tutorial


For Halloween, I thought it would be cute to dress up the baby almost-toddler as a monkey, and my preschooler will be the man in the yellow hat. My son loooooooooves Curious George, but the main reason I made the decision is that I found a 18 month monkey costume on clearance for $5 after Halloween :)

(And by the way, I do realize it's not even Independence Day yet!) Anyway...

I plan on taking one of his dress shirts, a pair of white pants, and a tie, and dying them all yellow with RIT dye. That way, all the yellows match. Aren't I smart? :)

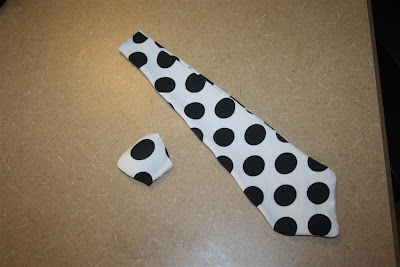
I'm going to make him a pair of pants out of a white linen skirt that my sister-in-law didn't fit anymore. For the tie, I thrifted a white t-shirt with large black polka dots for $1. When I saw the fabric, I knew it was just right!!!

Since this fabric is t-shirt material, I thought I'd just make a mock tie. (You know, a tie that's not really a tie at all). T-shirt material is just way too wonky for the real deal. I must warn you: there's hot glue involved. It just needs to last one day. This is the quick and dirty way to get the tie look without all the time it takes to make one the right way.

I took a few pictures as I went, but they're not the best. So sorry. It's hotter than @*#%^&$#, and I just didn't feel like going outside to get better lighting.

I drew and cut out a tie on a piece of newspaper for a pattern, held it up to my son, figured the size was just about perfect, and got to cutting the fabric. With right sides together, I cut two ties out and sewed them together. I sewed all the way around except for the top - I used the top hole to turn it right side out. Iron flat if you're perfectionist. If not, that's cool too. I sure didn't. You can topstitch the opening closed once the tie is right side out. I didn't, but it would look a little nicer from the back if you do. It won't really matter because the back is not going to show, so either way is fine.


Now it's time to start the faux knot. You will need a hot glue gun, some polyfill, a little more matching fabric, and something thin and plastic that you can cut... like a butter lid or something like that. I used a lid from a plastic Gerber baby food container.

Freehand a knot onto your plastic lid and cut it out. Hold it up to your tie to make sure it's the right size. Take your fabric scrap, wrap it around your knot, and begin hot gluing it down on the back. Hot glue down all the sides except for the top of the knot.


Before you glue down the last side of the knot, stuff in a little poly fill until you're satisfied with the look of the knot. Then go ahead and glue the last side down. Make sure you remove all the hot glue stringy things. You can see I forgot to do that before I photographed it.


Then I hot glued the knot to the top of the tie, added some stick-on velcro to both the back of the tie and the shirt, and voila, you're done!


Monday, June 25, 2012

Operation Finished Basement: Two Toned End Tables

We've been in our new house for almost two years now.
(When does a new house stop being a new house?)


We've been slowly but surely crossing things off our to-do list. When we first moved in, we remodeled the laundry room, painted 90% of the house, recarpeted the living room, and changed out many of the lighting fixtures. Eventually we swapped out the ugly builder grade bathroom mirrors for ones with frames and painted the kitchen. Last summer we put in a patio.

This summer it's the basement!!! (Paid in full by Uncle Sam's Tax Refund Check!)

Thank goodness for large tax deductions for having our children.

We have an awesome next door neighbor who is a contractor. We hired him to do the job. While he's been toiling away in the basement, I've been getting all the decor ready. As soon as he's finished, I'm going to swoop in and get my Nake Berkus on.


Here are my two-toned end tables that I finished this week (and in case you missed it, here's the two toned furniture I did last summer). They used to be a drab wood color, but I can't complain because they were free from my ex-boyfriend's mom. At my old house, our basement had a water problem, and the bottoms of these legs got damaged. I had to use Kilz primer to block out the stain, and then I painted most of the dresser white.

I like the two tone look though, so I decided to stain the table tops in a dark cherry. I <3 how they turned out!


mop it up mondays